
To remove spring-loaded door hinge pins, use a hammer and screwdriver to tap the pin upwards gently. Removing spring-loaded door hinge pins is a simple task that requires minimal tools and effort.
By following these steps, you can easily remove the pins without damaging the door or frame. This process can be done by anyone with basic DIY skills and will help keep your doors functioning smoothly. Whether you are looking to repaint your door or simply need to replace the hinges, knowing how to remove spring-loaded door hinge pins is a handy skill to have.
This guide will walk you through the process step by step, so you can complete the task quickly and efficiently.
Preparing For The Task
Gathering The Necessary Tools
Before you begin removing the spring loaded door hinge pins, gather the essential tools to make the process smooth and efficient. You will need:
- A flathead screwdriver
- A hammer
- A small nail or punch tool
- An old towel or rag
Ensuring Safety Precautions
Safety should always be a top priority when working with tools and hardware. To ensure a safe removal of the hinge pins, take these precautions:
- Wear protective eyewear to shield your eyes from any debris.
- Avoid wearing loose clothing that could get caught in the hinge mechanism.
- Work in a well-lit area to clearly see what you are doing.
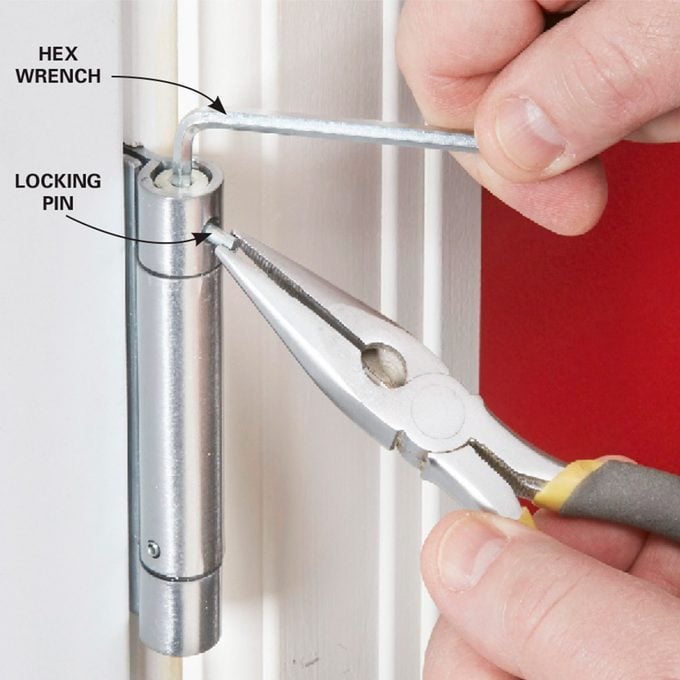 Credit: www.familyhandyman.com
Locating The Hinge Pins
To remove spring-loaded door hinge pins, start by locating the pins’ bottom. Use a flat-head screwdriver to lift the pin, then tap it out with a hammer. Be cautious and work methodically to avoid damaging the door or frame.
Identifying The Hinge Type
Look at the hinge design to identify whether it’s standard or spring-loaded.
Determining The Pin Position
Observe the hinge carefully to locate the pin position for removal.
Removing The Door
Removing the Door:
Opening The Door
Before you start, ensure the door is open to have easy access to the hinges.
Supporting The Door Weight
Use a sturdy object to support the door’s weight while you work on removing the hinge pins.
Removing The Hinge Pins
To remove hinge pins, tap them out with a hammer and pin punch, ensuring a secure grip.Credit: www.youtube.com
Dealing With Stubborn Pins
Using A Hammer And Nail Punch
If the hinge pins are being stubborn, a hammer and nail punch can be used to gently tap the bottom of the pin to release it from its position. Ensure that the nail punch is centered on the pin to avoid damaging the surrounding area.
Applying Lubricant
Applying a small amount of lubricant to the hinge pins can help loosen them. Once applied, gently tap the pins with a hammer and nail punch to encourage the lubricant to penetrate into the hinge. Allow it to sit for a few minutes before attempting to remove the pins again.
Utilizing Heat
If the hinge pins remain stubborn, using heat can help. You can utilize a heat gun or a small torch to carefully heat the area around the hinge. The expansion caused by the heat may make it easier to remove the stubborn pins.
Replacing Or Reinstalling The Pins
After inspecting the pins of your spring loaded door hinge, you may find that they are damaged or worn out. In such cases, it is necessary to replace them to ensure the proper functioning of your door. This section will guide you through an easy step-by-step process of replacing or reinstalling the pins.
Inspecting The Pins
Before replacing or reinstalling the pins, it is important to inspect them carefully. Look out for any signs of damage or wear, such as rust, bending, or excessive friction. Damaged or worn-out pins can cause issues with the door alignment, leading to problems like sticking or squeaking. Regular inspection of the pins will help you identify any issues early on and prevent further damage.
Replacing Damaged Or Worn-out Pins
If you find that the pins are damaged or worn out beyond repair, it is time to replace them. Replacing the pins is a relatively simple process, and you can do it yourself with just a few tools:
- A screwdriver
- A hammer
- A pair of pliers
- New hinge pins
Here’s a step-by-step process to replace the damaged or worn-out pins:
- Open the door and secure it in place using a doorstop or another object to prevent it from swinging.
- Locate the hinge pins on the door and the door frame. These are the metal rods that hold the door in place.
- Using a screwdriver, tap the bottom of the pin gently to loosen it. You may need to use a hammer if it is stuck.
- Hold the bottom of the pin with a pair of pliers and pull it out upward. If the pin is damaged beyond repair, you may need to wiggle it back and forth while pulling.
- Once the old pin is removed, insert the new hinge pin into the bottom hole of the hinge.
- Tap the top of the pin gently with a hammer until it is fully inserted into the hinge. Ensure that the pin is aligned properly.
- Repeat the process for all the hinge pins.
Reinstalling The Pins
If you found that the pins were still in good condition after inspection, you can reinstall them instead of replacing them. Follow these steps to reinstall the pins:
- Open the door and secure it in place using a doorstop or another object to prevent it from swinging.
- Locate the hinge pins on the door and the door frame. These are the metal rods that hold the door in place.
- Using a screwdriver, tap the bottom of the pin gently to loosen it. You may need to use a hammer if it is stuck.
- If the hinge pin is still in good condition, there’s no need to remove it completely. Just lift it slightly using your fingers or pliers to create a gap between the bottom of the pin and the hinge.
- Tap the bottom of the pin gently with a hammer to reseat it securely into the hinge.
- Repeat the process for all the hinge pins.
By following these simple steps to replace or reinstall your spring loaded door hinge pins, you can ensure the smooth operation of your door and prevent any inconvenience caused by faulty pins. Remember to regularly inspect the pins and address any issues promptly for optimal door performance.
Adjusting The Door
Adjusting the door is an essential step when removing spring-loaded door hinge pins. This process ensures that the door is properly aligned, swings freely, and closes securely. By following a few simple steps, you can easily adjust the door to ensure optimal performance.
Aligning The Hinges
To begin, you’ll want to check the alignment of the hinges. Misaligned hinges can cause the door to stick or not close properly. Here’s how you can align them:
- First, loosen the hinge screws on both the door and the frame using a screwdriver.
- Next, using a level, check if the door is vertically straight. If it’s not, shim the hinges with thin cardboard or hinge shims until the door is level.
- Tighten the hinge screws securely to hold the hinges in place.
Checking The Door Swing
After aligning the hinges, it’s important to ensure that the door swings freely without any obstructions. Follow these steps to check the door swing:
- Open the door and observe if it swings smoothly without hitting the floor or any nearby objects. If it does, proceed to the next step.
- If the door hits the floor or any obstructions, you may need to adjust the hinge position or trim the door to create clearance.
- Test the door swing again after making any necessary adjustments to ensure it swings freely.
Testing The Door Closure
The final step in adjusting the door is testing its closure to ensure a snug fit. Follow these steps to test the door closure:
- Close the door and observe if it closes securely without any gaps.
- If there are gaps around the door, adjust the hinges until the door closes tightly. This may involve tightening or loosening the hinge screws.
- Continue adjusting the hinges until the door closes properly with even gaps along the edges.
By aligning the hinges, checking the door swing, and testing the door closure, you can easily adjust your door to remove spring-loaded hinge pins effectively. This ensures that your door operates smoothly and securely, providing optimal functionality for your home.
Frequently Asked Questions Of How To Remove Spring Loaded Door Hinge Pins
How Do You Remove A Spring Loaded Door Hinge Pin?
To remove a spring-loaded door hinge pin, place a block of wood underneath the hinge to support the weight of the door. Then, use a hammer and a punch to tap the hinge pin out from the bottom. Once the pin starts moving, use pliers to grip and remove it fully.
What Is The Purpose Of A Spring Loaded Door Hinge?
The purpose of a spring-loaded door hinge is to provide an automatic closing mechanism for doors. These hinges have a built-in spring that creates tension when the door is opened and releases it when the door is closed, ensuring that the door closes securely and smoothly.
Are All Door Hinges Spring Loaded?
No, not all door hinges are spring-loaded. Spring-loaded hinges are specifically designed to provide an automatic closing mechanism for doors. There are different types of door hinges available, such as butt hinges, pivot hinges, and continuous hinges, each serving a different purpose in terms of functionality and design.
Conclusion
Removing spring-loaded door hinge pins can be a simple DIY task with the right tools and techniques. Armed with this knowledge, you can easily maintain your doors and keep them functioning smoothly. By following the step-by-step guide in this blog post, you can save time and money by tackling this project yourself.
Keep your doors in top shape with these tips!